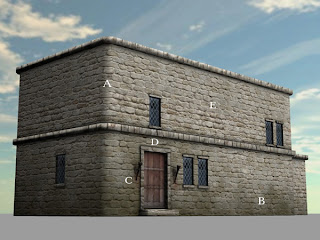
Texturing Low Poly Game Architecture
- A Unwrap your faces in such a way that stone or bricks wrap around corners
- B Use grunge maps, especially on the base of your building.
- C Use appropriate stencils - in this case, there are subtle rust stains dripping down the wall, from the rusty metal torches on the wall. A pair of rusty torches without rust stains would look odd. You can also use stencils to add the occasional crack or bit of damage.
- D Bake ambient occlusion.
- E Make sure that the building material you use, in this case, stone block, is scaled properly. This is especially true for things such as cinder blocks and bricks. Look up real world dimensions and set the tiling to be as close as possible.
- E Use tiling textures for large objects, like buildings. Some people cram the whole building's worth of textures into one image, but buildings textured in this manner will look low rez up close. Besides, you can use the same tileable stone, wood, metal, grunge etc. textures for the whole town. It makes sense - buildings in older towns especially, would be made of similar if not identical materials, because that's what's available locally. For example, a little viking village on the edge of a pine forest would be built from ...yep...pine. No need to have 25 different textures for 25 buildings. One tileable pine diffuse map, normal map, & grunge map would cover the wood part all of those buildings. Simply add a small AO map that is unique to each building.
- F Pay attention to how the object you are texturing would actually be built. In the image above, I've made an attempt to fit the stone to the height of the steps. This takes some playing around in split screen (be sure to set your 3d view to change as you move the UVs around). The stone arch is textured so that it would come close to functioning as an arch in real life.
- G Use specular maps on windows.


great tips for the experienced 3D designer. The mood is a key in graphics, and these tips are all about realism and mood. Thank you Doug.
ReplyDeleteThanks! I hope the format was useful (labeled pictures).
ReplyDeleteDoug, could you explain in one sentence what is a specular map that are you referring to? i.e. "G Use specular maps on windows"
ReplyDeleteA specular map is a greyscale image that defines the shininess of different parts of your model, black being not shiny at all, and white being as shiny as possible.
ReplyDeleteIn the windows, the glass is shinier than the mullions, so the glass parts of the specular map are whiter than the mullions.
How do you setup a UV map to be a tiled texture? a separate material with the UV image set to tile?
ReplyDeleteIn blender, just use a tileing texture, and in your image settings, play with the x and y size until the scale is correct. In 2.56, it's under texture - mapping - size x,y.
ReplyDelete